Kürzlich bin ich im Internetz über billige kleine Atmega32u4 USB Knuffel gestolpert.
Dachte mir die wirken gut um USB Adapter zu basteln, also hab ich gleich mal welche bestellt.
Als erstes habe ich mir einen Adapter vorgenommen um gängige 2-Kanal Fernsteuerungen aus dem Modellbaubereich als USB Joystick für Spiele zu nutzen.
Das ist vor allem interessant für VRC Pro, einer RC Rennsimulation für PC.
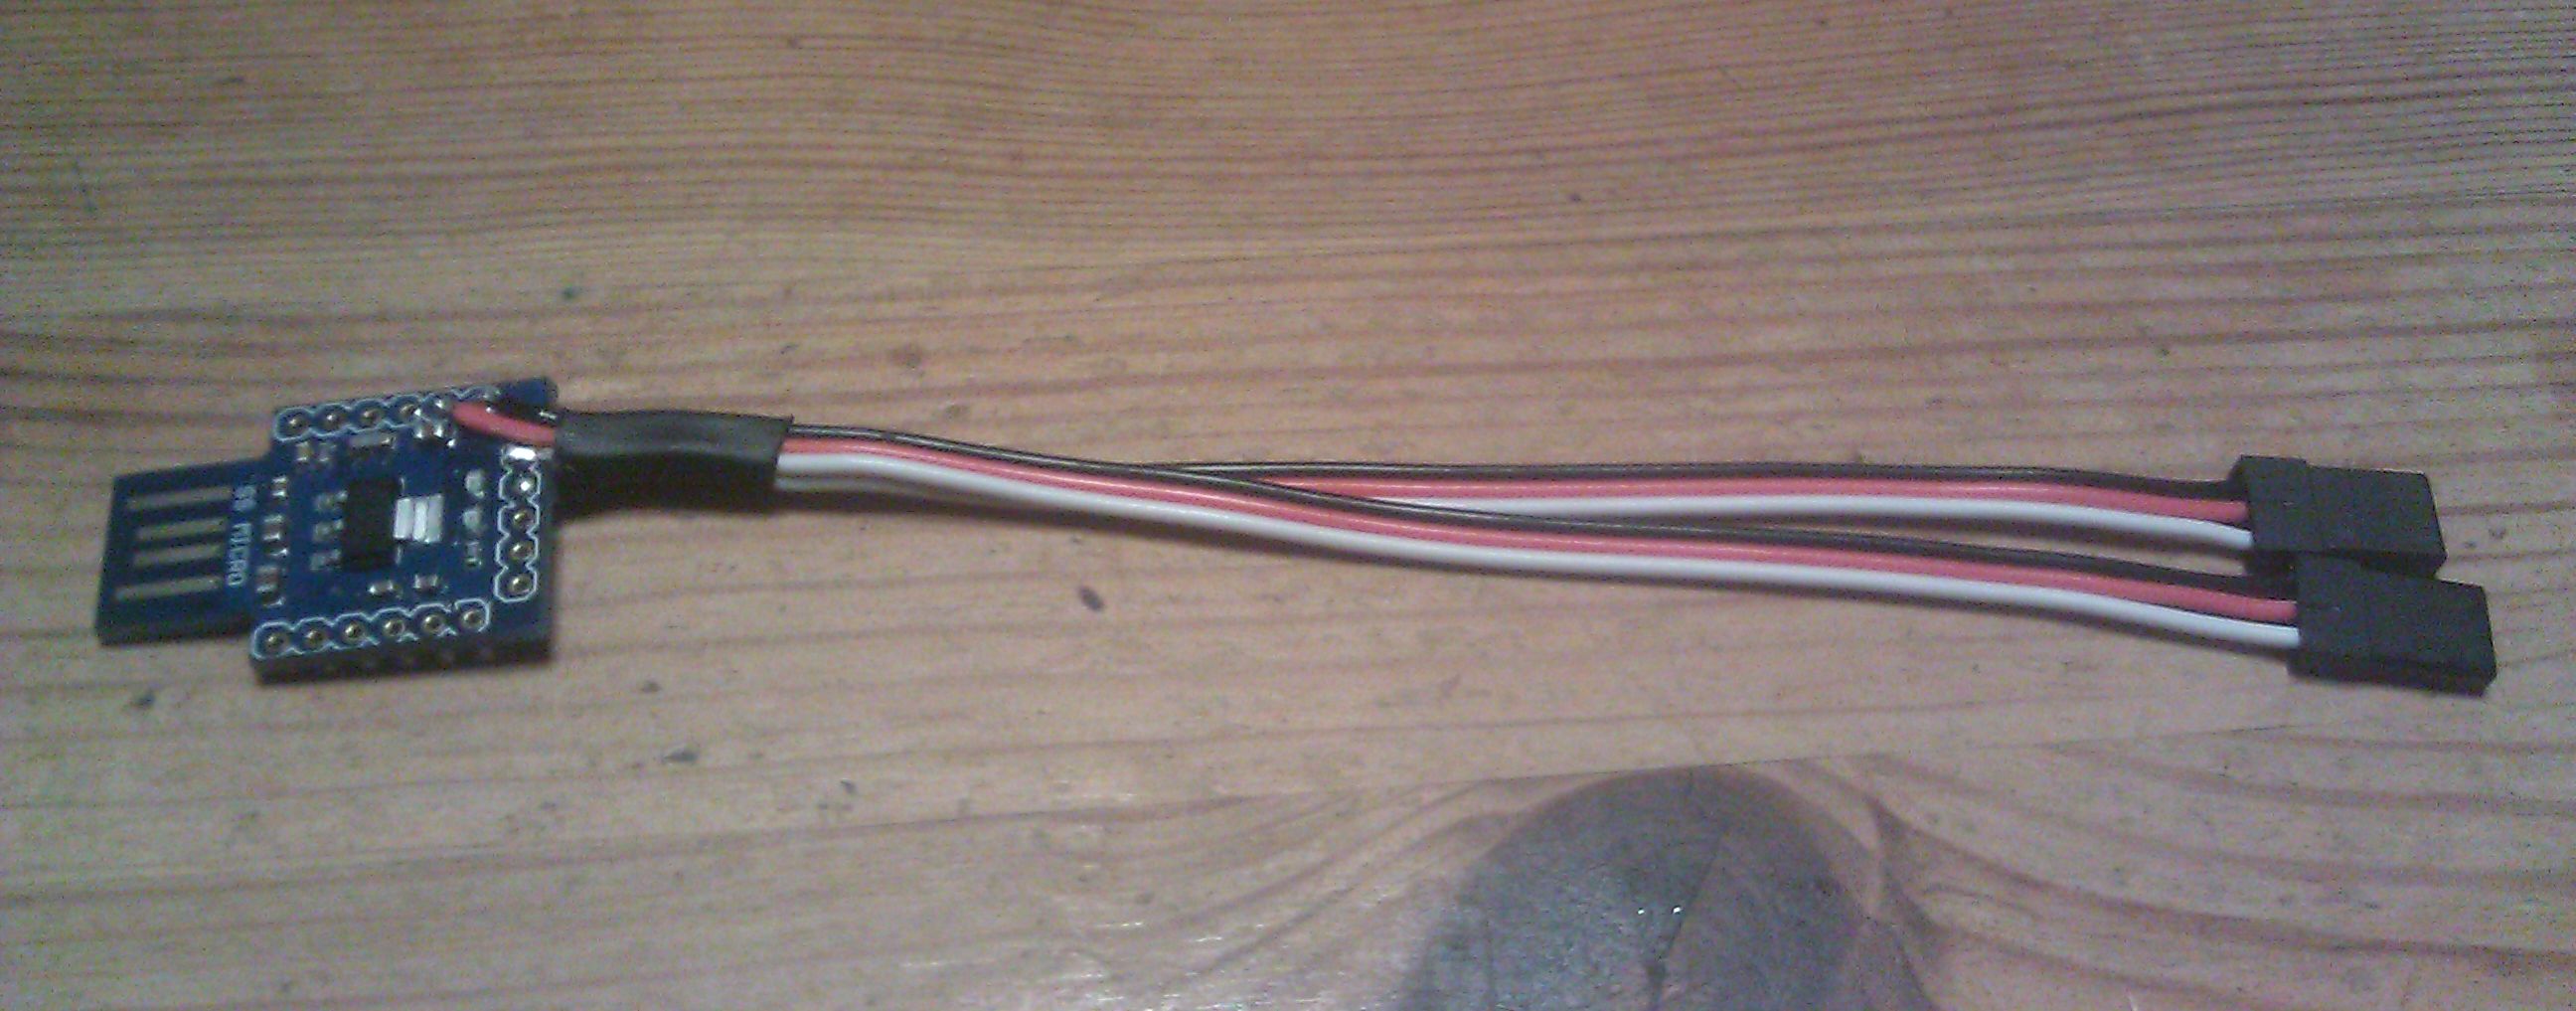
Die Platine findet man unter Arduino SS Micro und ansonsten brauchts nur 2 Servokabel.
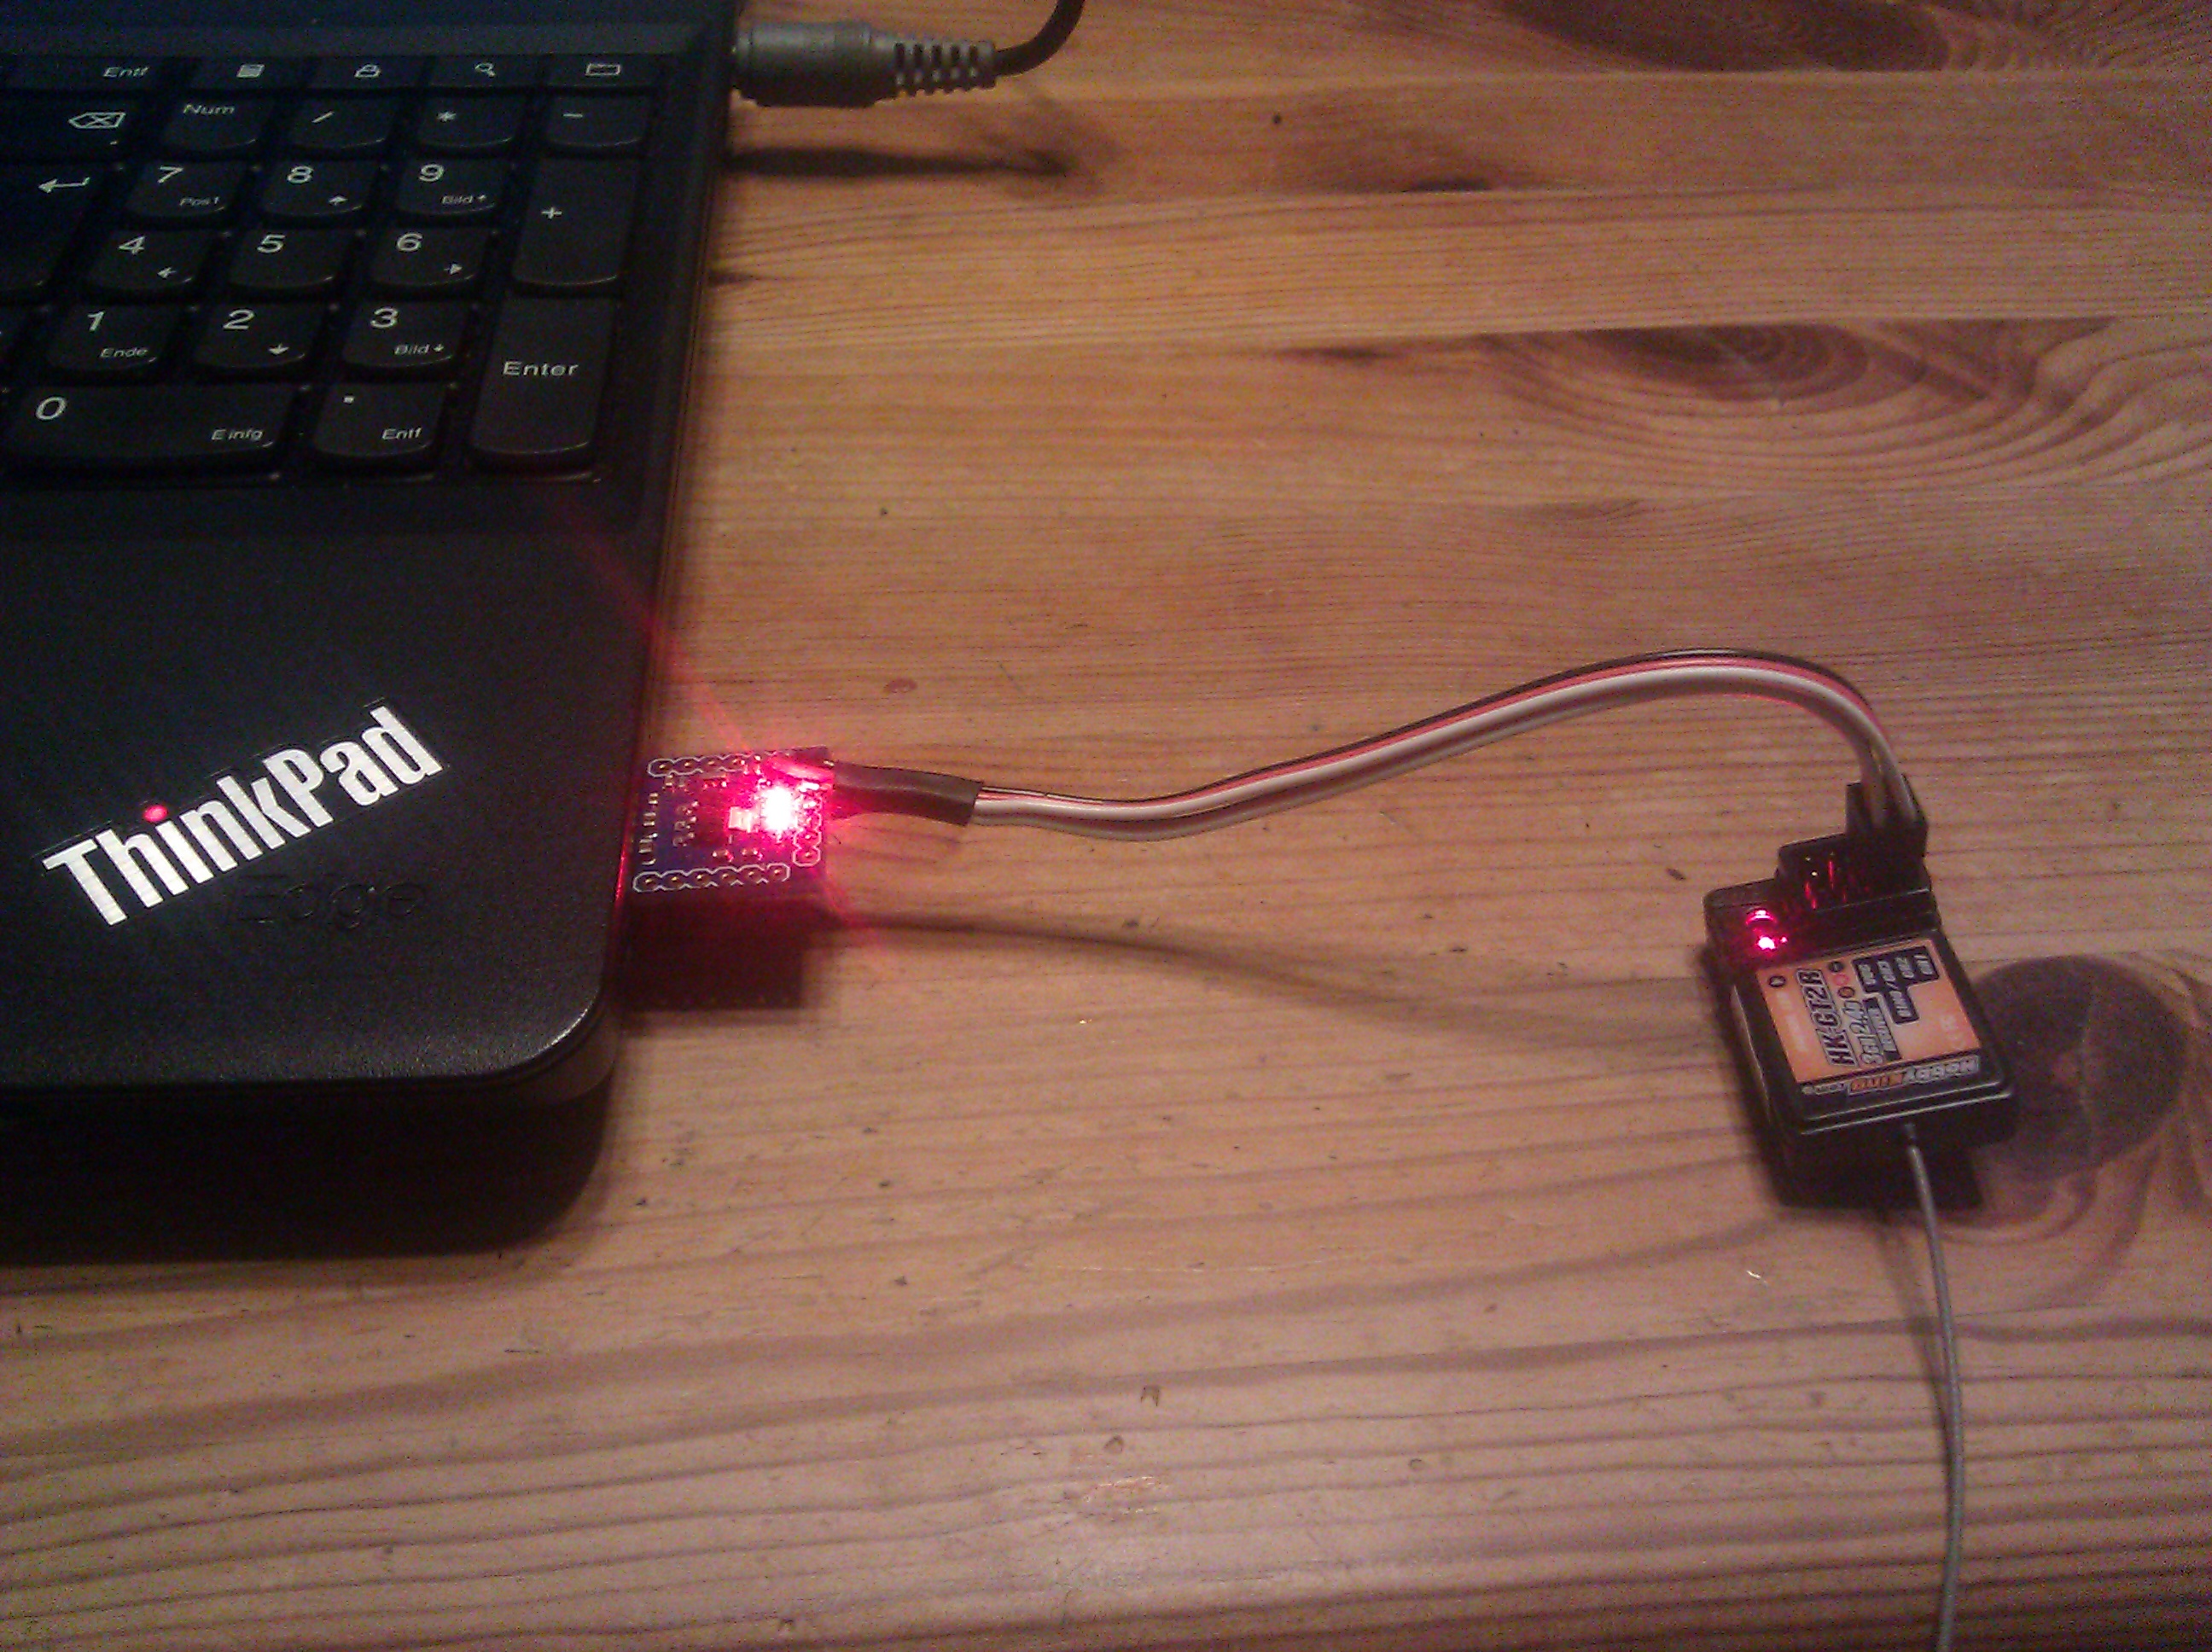
Plus und Minus des Empfängers kommen natürlich an VCC (5V) und GND des SS Micro und für die Signalleitungen habe ich die danebenliegenden Kontakte D3 und D2 genommen die mit PD0 und PD1 des Atmega verbunden sind.
Für das Häufchen Software habe ich Arduino und die ArduinoJoystickLibrary genommen.
Der SS Micro ist kompatibel mit dem Arduino Micro und kommt mit vorinstalliertem Bootloader.
Um die vorhandenen RX und TX Leds in meinem Programm nutzen zu können, musste ich die USBCore.cpp von Arduino bearbeiten. Diese liegt im Download natürlich bei, ist aber optional.
Die Datei sollte sich in Arduino/hardware/arduino/avr/cores/arduino befinden.
Die Änderungen lassen sich deaktivieren indem man #define NOLEDS auskommentiert.
Wenn man die Datei nicht ersetzt signalisieren die LEDs nicht korrekt ob beide Kanäle des Empfängers angeschlossen sind. Ist also eigentlich ziemlich unwichtig.
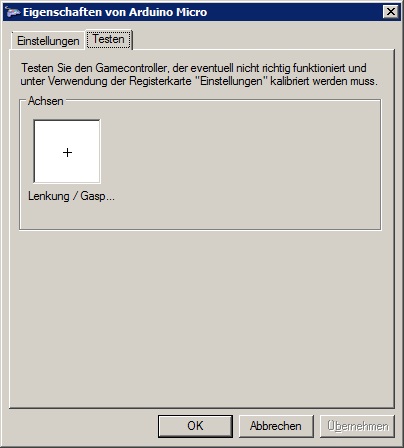
Nach dem Aufspielen der Software wird das ganze nun als USB-Gamecontroller erkannt.
Nun muss der Joystick nurnoch kalibriert werden und sollte dann seinen Dienst vollrichten.
Das ganze sieht nun nicht besonders elegant aus oder so.
Ist mit unter 5€ aber sehr viel günstiger als fertige Lösungen.
Vielleicht kann ja jemand etwas damit anfangen. Die Software findet ihr hier:
– Download 2Ch Version 1.0 –
Nachtrag: 4Ch Update
Aufgrund mehrerer Nachfragen gibt es hier eine neue Version mit Unterstützung für bis zu 4 Kanälen. Es beinhaltet auch ein Bild, welches die Verbindung veranschaulichen sollte.
Nachtrag: Kompatibilität
Das Projekt sollte ohne Änderung kompatibel sein mit folgenden Boards:
SS Micro -> SCL D3 – SDA D2 – TX D1 – RX D0
DM Micro -> SCL – SDA – TX – RX
CJMCU Beetle -> SCL – SDA – TX – RX
Arduino Micro -> 3 – 2 – TX – RX
Arduino Leonardo -> 3 – 2 – TX 1 – RX 0
Sparkfun Pro Micro (5V) -> 3 – 2 – TX – RX
Nachtrag: Update 1.1
Ich habe das Delay im Code reduziert wie Gary hier beschrieben hat.
Ich spüre zwar spontan keinen Unterschied aber andere vielleicht schon.
Nachtrag: 5Ch Update
Experimentielle Version mit einem zusätzlichen 5. Kanal an Digital Pin 7.
Funktioniert nur auf den Boards Micro, Leonardo und Pro Micro.
Ungetested!
PS: Eine englische Schritt-für-Schritt Anleitung findet ihr auf micropanoply.com!
English step-by-step instructions can be found on micropanoply.com!
Thanks!
Hi , is it possible make ir work with 3ch.?
Retarda from Portugal
Ricardo
Hey! Sure!
It would be easy to add two more channels by using pins D0 and D1, wich are connected to PD2 (INT2) and PD3 (INT3). :)
Greetings
hello it is me ricardo again.
so i bought the pro mini board with 32u4,and then i connect the pins 8, 9, 10 to the pwm signal from the receiver ,str, thr, aux.
i flash your code to the board, and the windows see it as a controler Sparkfan pro micro.
but when i move the steering or thr. on the radio nothing happens on the control setings.
can you guide me thro your code to change the input pins?
regards
Ricardo
A bit late but i updated the main post! :)
Hi, This looks very good and promising. Please would you post an update. I’m not very good at understanding flashing code and things like that, but I’m able to do soldering, etc. Please could you write a little more, with a few more pictures to help me. I need to make one work with VRC PRO and my Flysky FS GT3C radio. many thanks
any update on this ? does it work ??
Ricardo, Did you find the answer to your problem ? Did you get it working ??
Hi,
Great job!
I have ordered one board to use for VRC.
Do you mind sharing the connection scematic to se servo leads?
Thanks!
A bit late but i updated the main post! :)
@griff
Hello, yes it work, in my board that is a Pro micro (https://farm8.staticflickr.com/7538/27704970094_a922871f10_b.jpg)
and my pins PD0, Int0 is pin 3,
PD1, int1 is pin 2
Hummtaro, when i add a wire to PD2, int2, what i need to code on arduino to recognize the new input?
I just saw the update now, i will test-it and give a word.!
you are awesome !!!
it gave me joystic error :s
hello this line
#include are in red color whit this message
exit status 1
Joystick.h: No such file or directory
i really don’t understand, my arduino works just fine with you amaizing code, for flash the new code, i instal again arduino ide, add my board to board list and flash a setup and loop with nothing to clear the memory, after the simple flash, my windows doesn’t recognise the board…. what i’ve done? :(
Good news!!!!! soo at first for mistake i delete the bootloader of my board.
-After fix it, i installed IDE 1.8.9, and add the sparkfun board to library.
-Add a joystic library and your RCusb4, select my board and upload the code.
-Now with my Spektrum DX3S fanaly i can drive and push the RS bottun to restart the car!
My board is a pro micro ATMega32u4.
Glad to hear finally everything went fine!
I wish you much fun with your new adaptor! :)
Hi,
I am not able to verify/compile.
My computer detects the board as an arduino leonardo, but when i try to verify i get the following error:
Arduino: 1.8.8 (Windows 10), Board: „Arduino Leonardo“
In file included from C:\Program Files (x86)\Arduino\hardware\arduino\avr\cores\arduino\ArduinoJoystickLibrary-master\Joystick\src\Joystick.cpp:21:0:
C:\Program Files (x86)\Arduino\hardware\arduino\avr\cores\arduino\ArduinoJoystickLibrary-master\Joystick\src\Joystick.h:24:35: fatal error: DynamicHID/DynamicHID.h: No such file or directory
compilation terminated.
exit status 1
Error compiling for board Arduino Leonardo.
This report would have more information with
„Show verbose output during compilation“
option enabled in File -> Preferences.
I have the COM3 port selected and it is correct with the board.
Can anyone help me with a step-by-step?
This looks like you have installed the Joystick library to the wrong location.
First remove your wrongly installed joystick library..
Then extract the downloaded Joystick library to one of those locations:
%userprofile%\Documents\Arduino\libraries\
C:\Program Files (x86)\Arduino\libraries\
The folder named „Joystick“ should be directly in there.
NOT inside a „ArduinoJoystickLibrary-master“ subfolder.
Then you have to open my source code, select your Arduino Leonardo as board and press Upload..
Good luck! :)
@Ricardo
Hi Ricardo,
Can you please explain me how can i program my board?
What steps have you done to make it work?
Kind regards,
Rodrigo Catarino
@Rodrigo Ola vou assumir que sabes portugues.
Tens de adicionar o joystic á biblioteca do programa IDE do arduino, para ele conhecer os comandos joystic.
e depois é que mandas o codigo do Hummtaro para a placa.
no meu caso, ainda tive de instalar as placas sparkfun á biblioteca para o programa IDE conhecer o meu chip 32u4
Vielen Dank, läuft super! So macht VRC Spaß, kein Vergleich mit einem Gamepad. Fühlt sich fast echt an.
Hai,
die Mailadresse geht leider nicht mehr.
Das Arduino SS Micro habe ich nicht mehr so richtig gefunden und mit einem Attiny85 Board wimmelt das nur so von Fehlermeldungen beim kompilieren ;(
Fisch,
Das ‚SS Micro‘ findet man leider nur aus China: https://www.ebay.de/itm/273346469460
Alternativ funktionieren auch andere Boards mit einem Atmega32U4, wie z.B. ‚Arduino Micro‘ oder das etwas kleinere ‚Pro Micro‘.
Auf einem Attiny85 kann der Code überhaupt nicht funktionieren, da dieser über keine interne USB Schnittstelle verfügt..
Liebe Grüße
Hi I am trying this, but it only changes the „X Axis Rotation“ and „Y Axis Rotation“ when I do the calibration in Windows. The bars change and move around but the plus sign in the middle of the grid for the calibration never moves. What is happening?
Thanks!
Hello Michael,
the latest code supports 4 RC channels.
If you use only two of them, the others will not move.
Just calibrate with the two channels you use then. :-)
Funktioniert das ganze auch mit einem Arduino UNO? Die kleinen sind ja anscheinend auf die schnelle nirgendwo zu bekommen…
Für den Uno müsste das Programm aufgeteilt werden, sodass der USB Teil auf dem Atmega8u4 und der RC Teil auf dem Atmega328 läuft..
Einfacher wäre es ein Arduino Leonardo, Arduino Micro oder SparkFun ProMicro zu nutzen.
Auf diesen 3 problemlos erhältlichen Boards läuft der Sketch direkt. :-)
Vielen Dank für diese Anleitung und den Code! Habe das ganze heute für einen Vereinskollegen mit einem Pro Micro gebaut, für Signal müssen hier die Pins 2 und 3 benutzt werden, für Kanal 3 und 4 müssten es dann TX1 und RX0 sein, das habe ich aber nicht probiert weil es nur um einen Adapter für VRC ging.
Hi, is this the same Arduino but with different labelling on the contacts? https://i.ebayimg.com/images/g/ofgAAOSwT4lWS80k/s-l500.jpg
Many thanks, Arun
Hello,
it is a different board but it uses the same Atmega32U4 and should work just fine!
Use SCL, SDA, TX, RX for signal pins.
Greetings
Ich hab im Moment diese Fehlermedung Joystick_‘ does not name a type
Der Adapter wird vomPC als Arduino Micro erkannt. Empfänger binden funktioniert auch. Ich muss irgenwo etwas übersehen haben. Gibt es bitte eine Lösung ?
Das klingt als fehlt die Joystick Library!
Laden sie diese hier herunter und entpacken sie den Ordner ‚Joystick‘ in das ‚libraries‘ Verzeichnis ihrer Arduino installation!
Hallo zusammen,
ich habe ein anderes Board, und zwar dieses hier: https://www.amazon.de/gp/product/B07FQBQ4Z6/ref=ppx_yo_dt_b_asin_title_o02_s00?ie=UTF8&psc=1
Folgendes Problem, ich habe die Software schon auf dem Board, jedoch heißen die Ports hier ja A0-5 macht das was? Auf den Ports habe ich aktuell auch keinen Ausschlag in der Konfiguration. WEnn ich allerdings auf RX und TX anstecke habe ich einen Ausschlag in der Konfiguration am PC kann aber nicht wirklich konfigurieren, da sich das X nicht bewegt…
Kann mir bitte einer bei der Fehlerbehebung helfen? ICh kann ja in der Config nicht einfach aus den D ein A machen, da dann ein Fehler auftritt…. Vielen Dank.
Die Pins D3 und D2 an dem SS Micro entsprechen den Pins 3 und 2 am Pro Micro.
Das D vor den Ziffern bedeutet, dass es ein Digital Input ist..
Beim Pro Micro heißen die 4 Signal Pins also: 3, 2, TX, RX
Wenn sie nur zwei Signale nutzen, Beschleunigung und Lenkung, können sie den Controller dennoch konfigurieren. Einfach ignorieren, dass sich die anderen beiden nicht bewegen. :-)
Hi, sorry another question! Does the AVRPort23 ‚H‘ file need to be uploaded to the board too?
This file is used in RCUSB4.ino and will be included automatically.
You don’t have to care about it. :-)
Servus!
Gute Anleitung und Idee! Kommt momentan immer mehr zum Tragen.. :-)
In einer vorherigen Antwort wurde gesagt, dass es auf einem Attiny85 nicht läuft, da keine interne USB Schnittstelle vorhanden ist.
Wie sieht es denn mit diesem hier aus:
https://www.az-delivery.de/products/digispark-board?variant=27602549577&gclid=Cj0KCQjwsYb0BRCOARIsAHbLPhG13l2m1zZBtQR356sSyX5FzkfIE0P31nNLv-GqTlWh1G5dzMJXjbYaAihCEALw_wcB
Attiny85 mit interner USB Schnittstelle.
Wenn ja, wie wäre hier die Belegung?
Danke und Grüße,
Jan.
Moin!
Ja, die Nachfrage die letzte Woche ist erstaunlich!
Der Attiny85 hat zwar genug Leistung um USB 1.1 in Software zu Emulieren, was gerne getan wird, aber es ist keine USB Hardware.
Auch wenn ein Adapter damit möglich wäre, würde das ein gänzlich anderer Programmcode erfordern und am Ende vermutlich eine höhere Latenz haben..
Mein Programm ist darauf ausgelegt auf einem Atmega32U4 die maximale Performance zu erreichen und läuft ohne Änderung entsprechend auch ausschließlich darauf..
Und da es von der ArduinoJoystickLibrary abhängt, läuft es nur auf Boards die vollständig mit Arduino Micro und Leonardo kompatibel sind..
Liebe Grüße
Hello Hummtaro.
I want to thank you for putting this together for us to use however I have an issue with the code when trying to upload it to the board (Arduino Due). I get this error message: https://drive.google.com/open?id=1rU-oVTf2_n-N4xwtKtgZ8jX76g0ZJwXA
Do you have any suggestion why this would happen? What is the DDR port?
Hello Kristian,
this sketch is written only for Atmega32U4 based boards like Arduino Micro and Leonardo.
I use hardware features directly to get the maximum performance, making it impossible to run on a completely different controller..
Hallo, ich komme aus Argentinien und möchte eine Anfrage stellen.
Ich bin neu in diesem Bereich und wollte wissen, ob dies mit Atmega32u4 möglich ist
danke und sehr gut das forum
https://www.ebay.com/itm/New-Pro-Micro-ATmega32U4-5V-16MHz-Replace-ATmega328-Arduino-Pro-Mini/221891843710?epid=1042391255&hash=item33a9c8d67e:g:D70AAOSwVL1V~1dn
Ja, Pro Micro ATmega32U4 5V ist kompatibel!
Viel Spaß. :)
Hallo,
auch von mir ein großes Dankeschön für die Bereitstellung und Aktualisierung der tollen Doku!
Sind wohl einige RC Racer hier die jetzt wohl eher virtuell fahren… ;-)
Ich habe überhaupt keine Programmiererfahrung, aber ich konnte die Software problemlos auf folgenden Pro Micro laden:
https://ae01.alicdn.com/kf/HTB115IeFQ9WBuNjSspeq6yz5VXaY/Mini-USB-ATmega32U4-Pro-Micro-5V-16MHz-Board-Modul-F-r-Arduino-Leonardo-ATMega-32U4-Controller.jpg_640x640q70.jpg_.webp
Habe nur noch abschließend eine Frage zum Anschluss der Servokabel. Minus löte ich an GND, Signale sind auch klar.
Aber Plus, kommt das dann direkt gebrückt auf die J1 Lötstellen? Sehe ich das richtig?
Dankeschön für eine kurze Antwort.
Viele Grüße und weiter Durchhalten an alle!
Andreas
Hallo,
Plus kommt an den VCC Pin des Pro Micro! Der liegt Gegenüber von GND..
Viel Spaß mit dem Adapter! :-)
dos this work with ATmega328P chipset too?
thank you for your time
Nope, it’s written only for Atmega32u4..
i got the pro micro with a ATmega32u4 chip
computer recognize it as a leonardo.
i upload your sketch and th. and st. works but no ch3 or ch4.
when i try to calibrate it in windows, the 1 and 2 button wasn’t show up at all.
any suggestion?
thanks for the quick reply
All 4 channels are analog axis, no buttons at all..
If the other axis do not show up, you probably have used the old 2ch RCUSB code instead of the newer 4ch RCUSB4..
Hallo!
Ich habe keinen Plan wie ich die Software komplett auf den Arduino Pro Micro bekomme.
Habe mir die Arduino Software runtergezogen und hab den Sketch drin. Jetzt sagt mir das Programm „Fehler beim kompilieren für das Board Arduino Micro“ ??
Du benötigst auch noch die genannte und verlinkte ArduinoJoystickLibrary! :-)
@Hummtaro
Dankeschön! Funktioniert einwandfrei!
Nur einen Lötpunkt auf J1 gesetzt, damit Brücke besteht und 5V anliegen. Plus dann an VCC habe ich nun auch verstanden ;-)
Viele Grüße,
Andreas
Bei dem Pro Micro 5V sollte das gleich so sein! :-)
Hummtaro / Antworten
Du benötigst auch noch die genannte und verlinkte ArduinoJoystickLibrary! :-)
Moin Hummtaro,
vielen Dank für die Anleitung. Habe das ATmega32u4 verlötet und diese oben erwähnte Joystick Library runtergeladen. Beim entpacken erhielt ich folgende Fehlermeldung.
„Angegebener Ordner/ZIP-Datei enthält keine gültige Bibliothek“
Kannst Du evtl noch eine andere Joystick Library empfehlen. Mein Adapter wird zur Zeit nur als Tastatur/Maus erkannt. :-)
Vielen Dank und viele Grüße
michse
Irgendetwas anderes als die genannte Library wird dir nicht weiterhelfen.
Du musst die Library einfach nur von Hand in den richtigen Ordner entpacken anstatt die ZIP in Arduino zu importieren. Das steht auf der verlinkten Seite der ArduinoJoystickLibrary..
Hallo zusammen, komme so langsam voran, erhalte jetzt aber folgende Fehlermeldung:exit „status 1
AVRPort23.h: No such file or Directory“
Ne Idee, woran das liegen kann?
Ich danke euch,
Joe
Das kann wohl einzig und allein daran liegen, dass die Datei ‚AVRPort23.h‘ nicht da ist wo sie hingehört. Was auch immer du getan hast wird wohl falsch gewesen sein..
Hallo,
vielen Dank für diese Anleitung. Leider bekomme ich beim kompilieren eine Fehlermeldung.
Joystick_ does not name a type
In der Zeile:
Joystick_ Joystick(JOYSTICK_DEFAULT_REPORT_ID,JOYSTICK_TYPE_GAMEPAD,
Kannst Du mir hier bitte weiter helfen?
Vielen Dank und Gruß
Das klingt als fehlt die Joystick Library!
Laden sie diese hier herunter und entpacken sie den Ordner ‚Joystick‘ in das ‚libraries‘ Verzeichnis ihrer Arduino installation!
Hello,
how to run with sanwa SSR mode?
thanks in advance
You have to use the normal mode for analog servos!
I will not implement any manufacturer specific high speed protocols because i don’t own such hardware.
Hi, would this work on a arduino uno?
Nope
Hallo,
vielen Dank für den tollen Sketch. Hat bei mir gleich auf Anhieb funktioniert.
Ich würde gerne in einem Flugsimulator einen weiteren Kanal meiner Fernsteuerung nutzen, also insgesamt fünf statt der bisher vorhandenen vier Kanäle. Leider bin ich aber im Umgang mit Interrupts alles andere als sattelfest. Wäre es möglich, den Sketch für einen Arduino Leonardo entsprechend zu erweitern, und zu diesem Zweck den INT.6 (INT.4 ?, finde verschiedene Bezeichnungen…) auf Pin D7 zu verwenden?
Vielen Dank und Gruß,
hgj63
Hallöchen!
Hab oben eine 5Ch Version hinzugefügt!
Da ich sie selber nicht testen kann, bitte ich um eine kleine Rückmeldung wenn sie funktioniert.
Vielen Dank und viel Spaß damit!
Lieben Gruß
Hummtaro
@Hummtaro
Hallo Hummtaro,
vielen Dank: Auch die 5-Ch Version funktioniert in ersten Tests einwandfrei.
Nochmals danke für die Mühe!
Viele Grüße,
hgj63
Ausgezeichnet, vielen Dank! :)
Hello Hummtaro,
many thanks for the code and instructions. I am using the 4-CH version, and have wired mine up like this (https://imgur.com/lmSdott), but I am not able to set the channels 3 and 4 in the Windows calibration menu (https://imgur.com/DO28bLX).
Can you help me with the calibration? Thank you!
Hello,
Your wiring seems right and your screenshot shows all 4 channels.
What exactly is the problem? Channels 3 and 4 are not working?
@Hummtaro Really? How do I then use these channels in the game? I have assigned two switches on my radio to AUX1 and AUX2, but when I try to assign the marshal to one of the switches, nothing happens.
All RC channels are analog axis. It is possible that the game doesn’t support assigning axis for button functions.
In this case you would need to modify the sourcecode.
Has your button any visible effect in the windows joystick calibration window anyway?
I’m a novice, I bought a Pro Micro card, I connect to my windows 10 it installs as Arduino Leonardo, but I don’t know how to send the files to him
You have to use the Arduino software: https://www.arduino.cc/
Open the .ino file, select Arduino Leonardo as board and press upload